Quasar
Versions
Credits
Damian Abalo Miron (damian.abalo@cern.ch)
Windows / MSVC10 compatibility
Python-based scripts and tools
Benjamin Farnham (benjamin.farnham@cern.ch):
LogIt logging engine
Meta module
Use cases & ideas
Viatcheslav “Slava” Filimonov (viatcheslav.filimonov@cern.ch):
XML Configuration
Calculation engine
Node manager
Piotr Nikiel (piotr.nikiel@cern.ch, piotr@nikiel.info):
Framework’s concept and architecture and code-generation
Address Space, Device and Configuration generation (XSLTs, design files, scripts)
CMake-based build system
RPM generation for Linux
Documentation and screencasts
Build configurations for Raspberry Pi, Zynq and MSVC10 on Wine
Yocto and PetaLinux
CalculatedVariables
Stefan Schlenker (stefan.schlenker@cern.ch)
Use cases, ideas, optional modules mechanism
Cristian-Valeriu Soare
Embedded python module
Giordon Holtsberg Stark
Quasar with Yocto on a “big” Zync: ideas, consulting, development, testing
Dependencies
CentOS / RHEL (and dependent distributions): version 8 (i.e. CentOS 8, RHEL 8), version 7 (i.e. CentOS 7, RHEL 7).
For remaining systems (other distros of Linux, other Unix, embedded Linux: PetaLinux, Yocto)
C++ compiler with C++11 support (gcc 4.8x or newer is just fine)
OPCUA protocol stacks / toolkits (either of them is needed):
(paid product) The Unified Automation OPC UA C++ server toolkit in versions 1.5.x, 1.6.x, 1.7.x
(free and open-source) open62541-compat (made by quasar team). More info on alternative backends.
Boost development libraries. (In principle, boost-regex, boost-devel, boost-thread and boost-program-options should be sufficient).
Python3 and some libraries (Jinja2, colorama, lxml, pygit2)
cmake3, version 3.10 + (for older versions you could try older quasar versions)
kdiff3 for occasional merges.
Schema-aware XML editor for editing the design file. We use Eclipse, as can be seen in the screen casts. Any text editor will do but few of them are really convenient for editing XML files according to XSD schema.
Good C++ development environment (or IDE, …). Eclipse CDT does just fine.
Good merge tool. We use kdiff3 (available as kdiff3 RPM in SLC6 Linux).
ArtisticStyle ( http://astyle.sourceforge.net/ ) for automatic formatting of generated code. If you don’t use it, the generated code will look like a shipwreck (but will still work). Astyle is easy to get (e.g. standard in Ubuntu) so get it.
graphviz, if you want to visualize your object design in UML-alike class diagram.
UnifiedAutomation UaExpert or any other OPC UA Client for exploring OPC UA address space.
Valgrind, for checking memory-related problems
PDF viewer for opening UML-like diagrams created from design file.
Doxygen for generating documentation.
RPM Build tools for RPM generation
Quick setup hints for CentOS 8 (the most standard way)
Install packages from CentOS 8 default repos:
sudo yum install gcc-c++ gdb boost-devel boost-regex boost-program-options boost-signals cmake kdiff3 graphviz valgrind doxygen rpm-build xsd openssl-devel libxml2-devel xerces-c-devel python3-colorama python3-jinja2
Install packages from epel repo (by default enabled in CentOS 8):
sudo yum install astyle
Note that currently quasar is compatible only with Python3 and it expects “python3” executable to be somehow available. NOTE: users stuck on Python2 can use earlier version of quasar, e.g. 1.4.2.
Quick setup hints for CC7/CentOs7 users
Get Eclipse (www.eclipse.org), preferably the C/C++ Developers version (e.g. https://www.eclipse.org/downloads/packages/eclipse-ide-cc-developers/oxygenr) Once installed, install Eclipse add-ons for XML editors
Issue this to install software from the official CC7 RPM repos:
sudo yum install gcc-c++ gdb boost-devel boost-regex boost-program-options boost-signals jre cmake kdiff3 graphviz valgrind doxygen rpm-build subversion xsd openssl-devel libxml2-devel xerces-c-devel python2-pip libgit2 libgit2-devel python-colorama python-jinja2
Deploy Python’s pygit2 (recommended) WARNING: the version of pygit2 should match the version of libgit2-devel! At the time of writing it was 0.26.4
sudo pip install pygit2==0.26.4
If you have access to the UA SDK, install it (the evaluation version works fine). Quasar should work with UA SDK versions 1.3.2 up to 1.5.5. If you don’t have the UA SDK, you can run Quasar with open62541, through open62541-compat module which is off-the-shelf available in Quasar. Documentation : …
Download UaExpert for an universal test&dev tool for OPC-UA.
Quick setup hints for Ubuntu 20.04
sudo apt install cmake g++ libboost-all-dev libxml2-utils astyle xsdcxx libxerces-c-dev libssl-dev kdiff3 default-jre libxml2-utils python-enum34 python-lxml python3-pip
sudo pip3 install -U Jinja2
Quick setup hints for Ubuntu 19.04
sudo apt install cmake g++ libboost-all-dev libxml2-utils astyle xsdcxx libxerces-c-dev libssl-dev kdiff3 default-jre libxml2-utils python-enum34 python-lxml
Quick setup hints for Ubuntu 14.04
sudo apt-get install cmake g++ libboost-all-dev libxml2-utils astyle xsdcxx libxerces-c-dev libssl-dev kdiff3 default-jre libxml2-utils
Setup for Windows users
Tutorial
Optional modules
Quasar build system
Calculated Variables
Logging
FAQ
How to build an executable with debug symbols? Just append Debug to your “quasar.py build” invocation, i.e.: ./quasar.py build Debug
Build fails Try to read carefully the output. If you can’t figure the issue on your own, try contacting quasar-developers@cern.ch
The server starts up, but crashes. There are plenty of possibilities here. The best way is to build a server with debug symbols (explained above in the tutorial) and enable core dumping in your system. Then run it again and let it crash. You will obtain a coredump file, which you can load into GDB this way: gdb <path_to_executable> <core_dump_file> Then type ‘bt’ and gdb will show you crash back trace. If it seems that the crash is within quasar itself, please don’t hesitate and file a report to us.
quasar (itself) misbehaves (not to confuse with quasar-made OPC-UA components). What can I do?
You can increase verbosity of quasar tooling itself. This might point you to a problem (e.g. file permissions issues) or can help quasar developers diagnose the problem. The verbosity is controlled by environment variable called “QUASAR_LOG_LEVEL” and the most relevant levels are “INF” (the default, about no debug) and “DBG” (a lot of debug). If you use bash, you can increase the verbosity by invoking:
export QUASAR_LOG_LEVEL=DBG
Sometimes quasar tooling (e.g. anything you run via quasar.py command) will terminate with error. We did pay attention to be verbose enough but sometimes it might help to drop in the Python Debugger (pdb) to debug post-mortem rather than to drop to shell. This can be achieved by exporting the variable QUASAR_RUN_PDB to 1, e.g. in bash:
export QUASAR_RUN_PDB=1
The general support email is quasar-developers@cern.ch. You can get some support there or you can file a bug ticket directly via GitHub.
How to create a RPM package with my server? RPM builder is provided with the quasar. RPM builder builds “directly” from your version control system and not from your local files (this is intentional and will not be changed). At the moment SVN and Git are supported. Please have a look at scripts in RPM/build_from_svn or RPM/build_from_git.
You will need to set repository paths in the build scripts.
Then edit template.spec:
In the very first line, set name of the RPM. It shall match the value of “projectShortName” which you have put into design element of your Design.xml file.
You may edit Summary: field with short (one-line) description of the server.
You may edit %description section with long description of the server.
Review the list of files listed in %install section. These files will be packed inside the package. Add additional files, if applicable (e.g. documentation, data files, additional libraries, etc…)
If applicable, complete %pre, %post, %preun and %postun sections.
Commit changes in both files
To generate RPM, run either: ./buildRpm.sh –revision <revision_number> or ./buildRpm.sh –tag <tag_name>
IMPORTANT: For delivering production packages, you should first tag given release on SVN, and then generate RPM from the tag (using the second version of command listed above).
How to upgrade to newer release of quasar?
Download quasar in the version of your choice
Unpack it
Execute quasar.py upgrade_project which is in its root directory, passing path to your project to be upgraded as the first parameter: ./quasar.py upgrade_project <path>
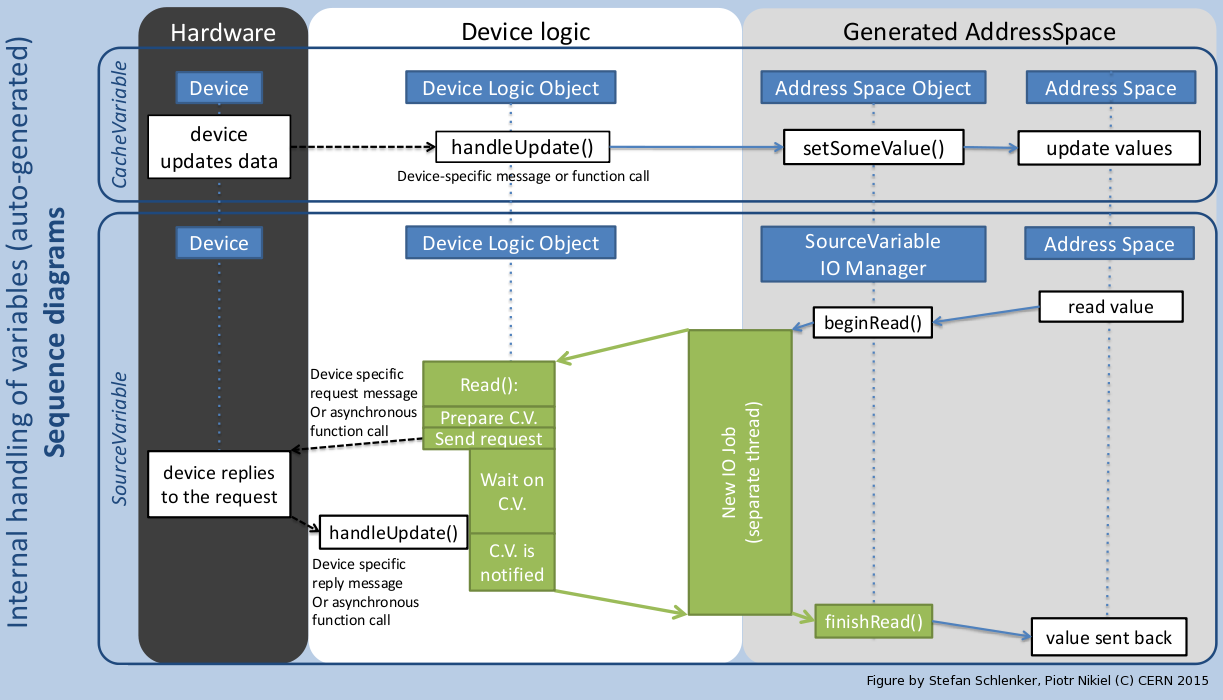
What is the difference between cache variable and source variable? The difference lies in where factual value of the variable is stored, which impacts what happens after Read OPC UA Transaction:
For cache variables, there are stored in the server’s RAM (thus “cache”), and the value served back to the client is the value from RAM. Cache variables are perfect whenever some device logic code updates the address space or reads from the address space.
For source variables, there are stored “at the source”, which for example might be at a remote computer. Therefore every Read transaction will trigger Device Logic method supposed to fetch that data from the source. Contrary to cache variables one may expect that such Read transaction may be blocking and time consuming, and therefore may be required to be executed in a separate thread of execution.
Here is a picture taken from our CHEP2015 poster with sequence diagrams for both types of variables:
Can I use evaluation version of the UA Toolkit to create an OPC UA server using this framework? You can. Note that for many basic features you can use free and open-source open62541-compat backend instead of paid UA Toolkit.
How to use upgrade_design tool? Rarely - but sometimes - XML stylesheet of Design file (Design.xsd) changes in backwards-incompatible way. For all such changes conversion tools are provided to mitigate the pain. upgrade_design is one of them. upgrade_design currently accepts this commands:
./quasar.py upgrade_design convert_to_hasDeviceLogic=yes
./quasar.py upgrade_design add_nullPolicy=nullAllowed or ./quasar.py upgrade_design add_nullPolicy=nullForbidden
./quasar.py upgrade_design remove_makeSetGet=yes
Please refer to the Changelog which lists (in backwards incompatibility column) at which moments you may need any of the above.
Can I automatically prepare the required dependencies? We have a shell script which could be useful if you e.g. need to crosscompile and do not yet have the libs required by Quasar. The script is places in the Documentation/Addons/prepare_dependencies.sh
How does a developer define specific command line options for my quasar server implementation? This is documented here: User Defined Command Line Parameters
How does a developer define a dynamic (at start up) configuration? For example, where the server ‘discovers’ connected hardware on start up. This is documented here: User Defined Runtime Configuration
How does a developer persist a ‘discovered’ configuration as described above? For example, where the server ‘discovers’ connected hardware initially and saves it for use thereafter as a static configuration. This is also documented here: User Defined Runtime Configuration
How do I link libraries, add include directories, use build configurations etc… ? See build system doc.